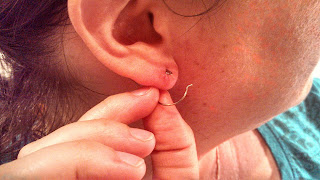
Our Relief Hoops are so comfortable you will forget you are wearing earrings at all. They are great for new piercings, for established piercings that have become irritated, or for alleviating piercings between wearing heavy or non-hypoallergenic earrings.
The earrings flex to allow the post end to slide into the catch at the back of the ear. They can be worn while sleeping. Because there is no use of adhesive on these simple niobium earrings, they can also be kept in the piercing while doing sea-salt water soaks for healing. They can also be worn while swimming or bathing.
These are an amazing solution for sensitive ear irritation and healing.
Being handmade, they may not be perfectly round or perfectly identical to each other. We do try to get them as close as possible though. Also, because they are handmade they can be made in bigger or smaller diameters. If interested in a different size, please message me and we can arrange a custom pair: http://www.etsy.com/convo_new.php?to_username=prettysensitive
To wear our Niobium Relief Hoops, follow along with our photographic step by step instructions here (click on the photos to see a bigger image):
1. Hold the Relief Hoop earrings between your thumb and forefinger on each hand.
2. Push the earring wires in each hand closer together by moving your hands toward each other (moving the ear post end of the Relief Hoop toward the opening of the catch end of the hoop).
3. Slip the ear post end of the Relief Hoop around the open end of the catch so the hoop is open.
4. Still holding on to each end of the Relief Hoop with a separate hand, gently bend the hoop open wider by moving the ear post end and the catch ends apart in opposite directions. Notice that you are not pulling the hoop apart into a "U" shape but gently bending the hoop open sideways.
5. Now it is time to insert the ear post end of the Relief Hoop into your ear lobe piercing. I prefer to orient the ear post end of the hoop on top while holding it with the opposite hand from the ear I am working on. Orient the angled ear post end so that it begins to go through the piercing straight and continue to feed it through the piercing.
6. The easiest way to close the Relief Hoops is to continue to feed the Relief Hoop through your piercing until the catch end is at the front of your ear lobe. You may choose to stand in front of a mirror to see what is going on for the closing of the hoop.
7. Now once again hold each end of the Relief Hoop with a different hand's thumb and forefinger. (This can be a little awkward feeling.)
8. Now just as you gently bent the Relief Hoop open, now you will move the ear post end and catch end back toward each other, swooping the ear post end around the catch and back into the opening of the hooked catch. (Looking in a mirror may help to make sure you are moving the ends the correct direction relative to each other.)
9. Finally, spin the Relief Hoop earring back through the piercing so that the ear post and catch are located at the back of the ear lobe.
You can find our Niobium Relief Hoops for sensitive ears in our Pretty Sensitive Ears' etsy shop. Check out all of our other fancy nickel free Niobium earring styles while you are there too - dangles and posts for every look!
Thanks for your visit!
xoxo - Amanda


No comments:
Post a Comment